Healthcare & Dental Facebook Ads – Identifying Your Ideal Audience
You did it. You took the first step toward getting new patients through Facebook advertising, and figured out the campaign objective for your new ads. You triumphantly chose “Traffic” or “Brand Awareness” or “Engagement” and clicked through to the next screen…
Only to be met with this absolute nightmare.
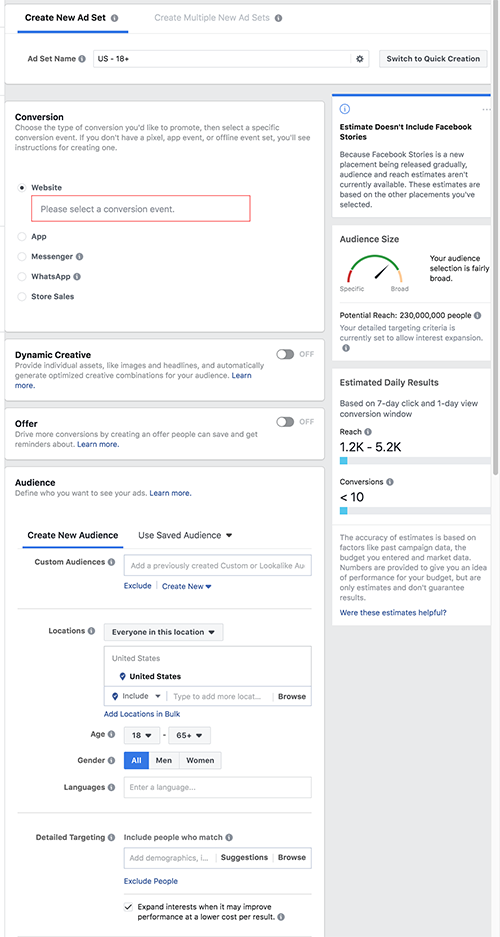
With this many options, how can you figure out exactly what’s right for your practice? Who is your ideal ad audience, anyway?
Take a deep breath – and keep reading. Below, I talk through this process step by step to identify the key components of this messy Ad Set screen, and how you can come out on the other side with a nicely sized audience that makes sense for your campaign objective.
Hold on, what’s an ad set?
First off, I’m going to interrupt myself to provide a little more information about the anatomy of a Facebook campaign. Knowing these three components by name will save you some headaches down the line.
- The campaign is the umbrella under which the ad sets and ads live. The campaign is determined by the campaign objective (Conversions, Brand Awareness, Video Views, etc). This is the broadest component.
- The ad set is the part of the campaign that will be delivered to a certain audience. You can have multiple ad sets in a campaign to target different types of individuals with the same ultimate objective. Different ad sets might target one location vs. another, individuals who have visited your website before vs. those who have not, or a thousand other permutations that we’ll discuss later in this post.
- The ad is the post that will be shown to the ad set’s audience. This is the smallest piece of the Facebook campaign, and is the component that targeted individuals actually see and interact with.
Questions to ask yourself before creating your first ad set
What’s your campaign objective?
Although you’ve already chosen your objective, keep it in mind as you approach your prospective audience. Who is going to be the most likely to successfully interact with that objective? Here’s an example. If your objective is Video Views or Brand Awareness, you’re likely advertising to individuals that are unfamiliar with your practice. On the other hand, if your objective is Conversions or Leads, you’re likely advertising to individuals that have connected with you before. What does that unfamiliar audience look like, vs. the familiar one?
Is this a campaign that you’d like to show a more general audience vs. someone specific?
This is a bit of a trick question. In my opinion, every campaign should have a specific audience. Facebook makes it all too easy for you to cast an overly wide net because their main goal is for you to spend money on their platform, and a bigger audience means a more expensive campaign. But a bigger audience doesn’t also correlate with a better response. Ad leads that are physically too far from your office, or uninformed about a procedure, are likely to be unresponsive to your staff’s attempts to book their appointment and get them into the office. There’s nothing more frustrating than spending ad dollars on a lead, then losing additional resources through your staff taking the time to call and email them without ever getting a response.
Even in a situation where you’re just desperate to get the word out about your practice, you should never go for a blanket “my location + 20 mile radius” as your sole means of targeting. This is going to cast too wide a net, so that you spend advertising dollars collecting individuals that aren’t ultimately going to be ideal clients (or ever really connect with your office).
So what should a more general campaign look like? Start broad and then add in shades that will narrow your scope. There’s a big difference between a highly specific, small audience and a broader but still targeted audience. The former is typically very precise and often related to the prospect’s past interactions with your ads, website, or Facebook page (more on that below). The latter is typically bringing in a cold audience, who has not interacted with your practice before – but is primed to be a good fit.
Take a look at the following to guide your ad targeting –
- Consider your target audience’s interests. What have they recently been searching for / showing interest in online? Are they parents, what are their professions, what are their income demographics?
- Look at a map using a radius tool and ask yourself, realistically, how far prospects would be willing to travel to visit your office. Facebook also offers the option to target by a group of locations without radii, which can be useful when there are areas in your immediate radius that you’re not interested in targeting.
- Consider the offer you’re putting forth in the ad. Is this something that is going to be appealing to an outsider who has not had any contact with your practice, or are they unlikely to see the appeal? You want to develop your ads so that the audience at the top of the funnel is shown an easy-to-understand offer. Then those who interact with the ad / offer but don’t actually convert are guided on to the next step in the funnel, where they receive a more detailed offer for a service or product that they’ve already been educated about. The top of the funnel audience is more broad, and the middle and bottom of funnel audiences are more defined.
Who is a specific individual you’d like to see your ad?
Now is the time to determine your ideal buyer. We touched on this in the previous section, but there are a few specific factors you’ll want to consider, including –
- Age – can choose a range between 13 and 65+
- Gender – can choose all, men, or women
- Languages – can choose any language
- Demographics – parents, married vs. single, education level, profession, income level
- Interests – online activities, pages they’ve liked, and related topics
- Behaviors – purchase intent, purchase behaviors, devices used
- Connections – people who like your business’ Facebook page (can include or exclude), friends of people who like your page
Once you’ve thought through each of these, congratulations! You have articulated your buyer profile.
Now to get down to the nitty gritty – how do you actually set up these restrictions on the ad set page?
How to Define Your Ad Set Targeting Options in Facebook’s Ads Manager
Location
There are a few different options in the location section alone, and it can be a bit tricky to understand.
First of all, you need to decide whether you’ll be targeting:
- Everyone in the specified location
- People who live in the specified location
- People recently in the specified location
- People traveling in the specified location
If you’re unsure of which might make the most sense for your practice, just choose option#1.
Next, you’ll set the location itself. Click inside the location box and type in the city you’d like to target, then adjust the radius to the appropriate number of miles. The map will update to show you what that area will include.
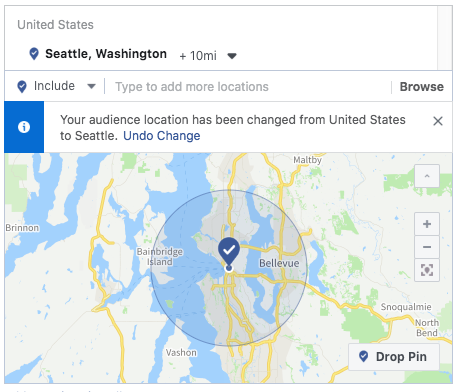
Also, if you’re interested in targeting the specific city but not a radius, click the “+10 mi” section to bring up this menu: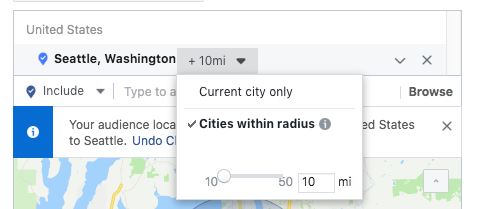
You can then switch to “Current city only.” If you’d like to target a group of cities, you can click “Add locations in bulk” at the bottom of the map to do so quickly and not need to enter them one by one.
Age
Select an age range that reflects your ideal customer or patient.
Gender
Choose whether you would like to target men and woman (“All,”) or either men or women.
Languages
Choose the languages that you would like your targeted audience to speak.
Detailed Targeting
This is where things get a little overwhelming. There’s a whole lot in the detailed targeting box, but once you start making choices you can take advantage of the helpful “Suggestions” feature to bring up additional relevant options instead of needing to sift through absolutely everything.
Let’s say I want to target new parents – I type “parents” into the bar and receive these options.
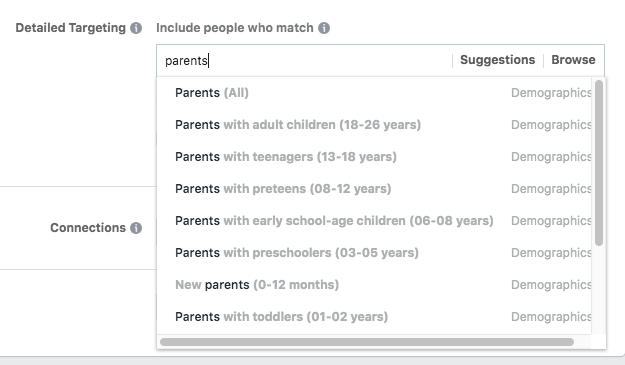
I’m interested in new parents only, so I select “New parents (0-12 months).”
Now that this selection been added to my targeting, I can click “Suggestions” to pull up related interests, demographics and behaviors that might be useful for my audience –
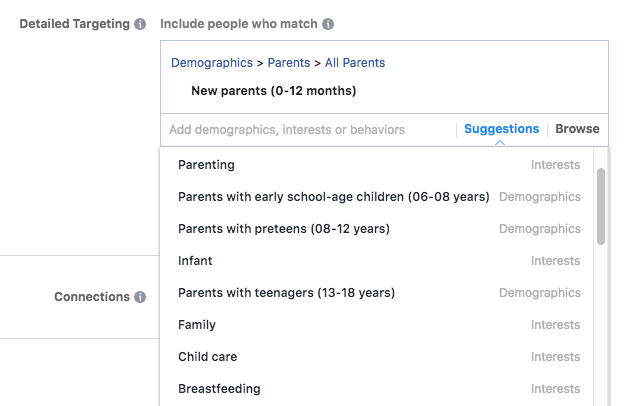
You can also click “Browse” to view an organized menu of all your options, which is useful if you’re just getting started with ad targeting and not quite sure what to search for. These are organized under the umbrellas Demographics, Interests and Behaviors.
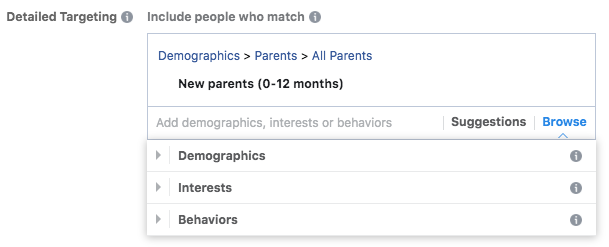
One more thing in this section – don’t overlook the Exclude or Narrow Audience options below the targeting search window.
- Exclude – Chances are, you’ll almost always want to be making exclusions to your ad set. For example, if you’re hoping to target individuals whose recent activity indicates an interest in getting dental work done, you’ll want to exclude people who are in the dental profession as those aren’t prospective patients.
- Narrow audience – This option allows you to add additional behaviors, interests or demographics that must be shared by the group you’ve defined. This helps refine the overall audience.
Connections
Choose whether you would like to include or exclude people who like your business’ Facebook page, or include friends of people who like your page (which can provide a valuable audience).
Save This Audience
You’ve put all the hard work in – be sure to save this audience with a descriptive name so that you can use it in future ad sets without needing to redo the legwork! While you can always duplicate ad sets to use in the future, I like to save individual audiences so that I can grab them whenever I need.
Audience Size
You’ll notice a live-updating area on the right hand side of the Ad Set creation screen with the title “Audience Size.”
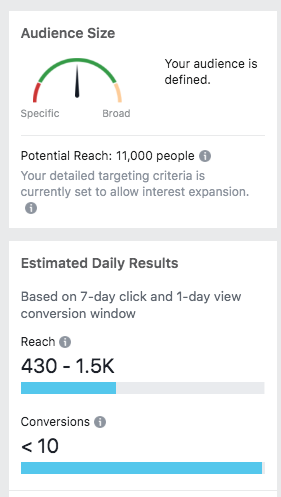
This helpful section is important to keep an eye on as you refine and narrow your audience. The meter at the top will give you an idea of whether your audience becomes too small for ads to regularly be shown. The estimated daily results provide a rough estimate of the kind of results you might have with the size of your audience and the budget that you set. Remember, these figures aren’t necessarily accurate – they just provide a general idea of what you can expect to see once that ad set has been running for a week.
Custom Audiences
There’s a huge component of your audience that we haven’t even delved into yet – custom audiences. These audiences can be incredibly useful, as you can use them to target niche groups of individuals that may make the most sense for your practice – from recent website traffic to your existing database. But because creating these audiences can be a bit technical, I’m saving this for our next post.
Feeling overwhelmed by the prospect of managing your own Facebook campaign? That’s what we’re here for. Get in touch with details on the campaign you’d like to run and we’ll take care of everything you need – and deliver new business to your office. Reach out today!
