
6 Steps to Create an Online Store for Your Small Business (Without eCommerce Experience)

While COVID-19 may be “over,” small business owners are still riding the uncertainty rollercoaster. Customers are increasingly conservative with their budgets. There may or may not be an official recession. We don’t know what’s coming next. If you’re like me, you’re wondering – how can my small business finish 2023 financially strong?
Of course, we need to be realistic – for most brick-and-mortar businesses, the last 3 years have been nonstop turmoil. It became more difficult for customers or patients to visit in person. There have been local regulations to comply with in terms of COVID precautions. Illness (or fear of illness) has led to significant cancellations.
With in-person services becoming more and more fraught, small business owners have turned to eCommerce to boost their bottom line and avoid COVID concerns altogether.
But if you’ve never had an online store, setup can feel daunting. And if you’ve never packaged your services in an eCommerce-ready capacity, this might feel altogether impossible.
One good thing about COVID is that it has forced an incredible amount of creativity. By applying that mindset, you can get your own online store up and running – and bring in revenue without even having to worry about a face-to-face interaction.
We’ve compiled a guide below detailing how we help our own clients set up their online stores, and what makes sense for some of the professionals we work with (med spa owners and estheticians, dentists, cosmetic physicians & more).
A few notes before we get started:
1. This guide is best for existing businesses that are either service-oriented or typically rely on a physical location. If you’re looking to both start a business and then sell services or products online, here’s an amazing, super in-depth guide from BigCommerce that will be a big help.
2. Ready to try out eCommerce, but hoping to hand the actual store creation off to a professional? Just get in touch to connect with our team and get selling online ASAP!
Step 1: Determine What You’ll Be Selling
You may never have considered how you can package your products or services for an online-friendly transaction. Now is the time to start brainstorming! What you sell online is going to be unique to your business, obviously, but considering which category or categories could fit will help you start getting ideas.
The most basic eCommerce categories include:
Products
Physical items that you either already sell in-store or will create for the purpose of generating revenue online. Determine what physical items you’re already selling at your location and you’ll be able to determine whether they also make sense to sell online. Are they one-size-fits-all? Do you need to provide guidance for the customer/patient to make the right choice? Are they readily available and neatly packaged, and thus simple to ship or hand off during a curbside pickup? Ask these questions for each product and make a list of those that are ready for online purchase.
Examples: For our clients, this has included skin care product lines, professional-strength home tooth whitening kits or whitening refills, and treatment recovery items like compression sleeves/stockings and post-chemical peel kits.
Services
Many service providers (particularly in the healthcare niche) feel that there just isn’t a way for them to presell services and collect online payments due to the variability of their services. But I’ve found that, in nearly every industry, there are a few package options that are going to be pretty consistent from customer to customer. Identify these, and you’ll be able to start offering them online with incentives to purchase – an exclusive discount usually does the trick. By purchasing the service online, your customer will be able to save money and then receive the service once COVID permits.
Examples: For our clients, this category has included Botox/Dysport packages, filler syringes, laser resurfacing treatment packages, in-office teeth whitening, virtual consultations, chemical peels.
Gift Cards
Online gift cards are the COVID-era business owner’s best friend. They make it possible for you to generate revenue and also ensure future purchases when the gift cards are used (on services/products that exceed the gift card amount). You’ve probably received a few promotional emails during these holiday months with offers like “$20 off a $100 gift card” – and that’s because these offers work. Even better, setting up a gift card system is simpler than configuring your online store to sell products or services (more on that process below).
Promotion examples: $20 off a $100 card (with a limit of total cards that can be purchased); buy a gift card, get one free.
Step 2: Create a Square Account
There are many different eCommerce platforms out there. Because we’re putting an emphasis on easy setup in this guide, we’re going with Square as the recommended option. Square online stores are built on the Weebly platform and are generally straightforward. There are a few reasons why this is what I typically recommend to small business owners without eCommerce experience –
- Many businesses already have a Square account, so they can skip the financial setup and bank linking
- There are no monthly fees for hosting an online store
- Store setup is straightforward and there isn’t an overwhelming range of options to choose from
- Gift card setup is extremely simple
- If the business does have a Square account, existing items can be easily added to the online store
- There’s no need to connect your existing website or embed the store in your site (unlike WooCommerce and many other WordPress-oriented eCommerce plugins)
I am not affiliated with Square and we aren’t receiving any kind of incentive to recommend them – we’ve just found that this is what’s typically simplest, fastest, and most intuitive to set up for your first online store.
Square Account Setup Steps
While you can create an account through the mobile app, I recommend doing so on a computer as it simplifies things and makes it easier to input all the required information.
- Go to squareup.com -> click Get Started.
- Enter and confirm your email address, create a password -> click Create Account.
- Select your business type from the drop-down (choose whatever is the best fit). Enter your business and personal information. Click Continue.
- You’ll be asked to input your personal and business information and answer a few questions to verify your identity. When complete, click Continue.
- Enter your phone number or email address.
- Square will send you a link to download the mobile app – this is not required to have your online store, so if you don’t plan on using Square at your physical location, you can skip it.
Business/Personal Information Required to Sign Up
As a financial institution, Square requires that you provide information that will allow them to verify that you are who you say. These pieces are all required:
- Full legal name
- Social Security number (you can also add your EIN, which helps them identify you as a business and simplifies tax prep, but is not required)
- US-based bank account
- Date of birth (must be 18+)
- US home mailing address
Second Place Recommendation: Shopify
The other platform I recommend is Shopify – it’s more robust than Square, and highly customizable to meet your needs. As an example, we recently ran a promotion for a client who wanted to ensure that it wouldn’t be possible for their customers to purchase more than 5 discounted gift cards. Square doesn’t have maximum limit options, so there’s no way to force this (aside from writing that only 5 are allowed, which customers can still disregard). Shopify, on the other hand, has an app you can install to set a product purchase limit – and we were able to set this up so that the promotion functioned exactly the way the client wanted.
That said, being more robust comes with its own disadvantages. There’s much more to configure with Shopify, and the barrier to entry is higher than with Square (at least in my opinion). But if Square/Weebly seems like it won’t be complex enough for your needs, that’s the next option I’d recommend. Shopify’s plans start at $9/mo.
Step 3: Build Your Online Store
Time to get down to the nitty gritty! Let’s walk through the steps to set up your online store.
- Navigate to your online Square Dashboard -> select Online from the list of options on the left hand side.
- Click Get Started.
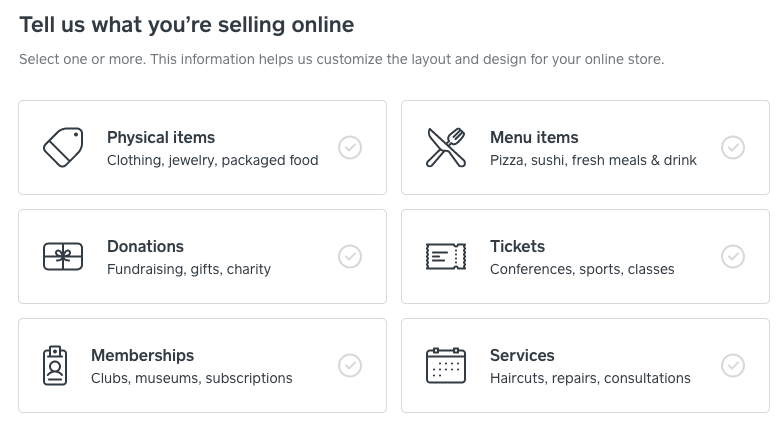
- Choose what you’ll be selling online – you can make multiple selections. This can be changed later, but helps Square determine what is the most useful for your store in terms of layout and features. You’ll most likely be selecting Physical Items, Services or both.
- Choose how you’ll be fulfilling orders. Most of our clients prefer curbside pickup, but some also ship products.
- Choose between a single page store and a full website. This depends on what you’ll be selling, how involved you’d like setup to be, and how much control you’d like to have over the store. If you’re fine with just one page that shows all your products, and don’t want to worry about setting up different categories / pages or other options, choose “Single shopping page;” if you anticipate your store needing to be more complex or you don’t want to show all your items in a single section, choose “Full website + online store.”
Square also has a “Help me choose” button that will guide you through a few questions and provide tailored recommendations. - Square will then create an initial template for your store and take you to a dashboard listing further setup steps, which are detailed below.
- Design your website: This is where it’s easy to get bogged down, but doesn’t need to be an overwhelming process. Square will walk you through each step of the process. To start, choose the general features you’d like to include (contact form, location info, Instagram feed, etc). Upload your logo, choose a font and color scheme, and click Finish. You’ll be able to adjust these choices later and actually change the store content (it will show placeholder content at this point).
- Select items to include: If you have an existing item library, Square will pull those as options that you can click or unclick – if you don’t have an existing library, don’t worry, we’ll get to item creation in the next step.
- Set up your domain: This can be a little confusing – details on each option are below:
- Find a custom domain – Square requires that you purchase a custom domain through them in order to use it for your store. I really don’t find this option to be necessary, and would recommend you use #2 or #3.
- Use a domain I own elsewhere – This option will require some DNS configuration and you’ll need access to your domain registrar. This also requires a paid Square plan. If you’re fine to upgrade your plan and want to host your store on a subdomain (and have the capability to set that up), go ahead with this step – but if you’re feeling out of your depth, that is completely understandable and I’d recommend moving on to option #3!
- RECOMMENDED: Use a Square subdomain – This is the free, no-stress way to customize your Square store URL. Simply add the subdomain you’d like to use (typically your business name, but can be anything you’d like – it just can’t already be in use by another Square store) and click Change. Your website address will be customized for free and you won’t need to to any other complicated setup!
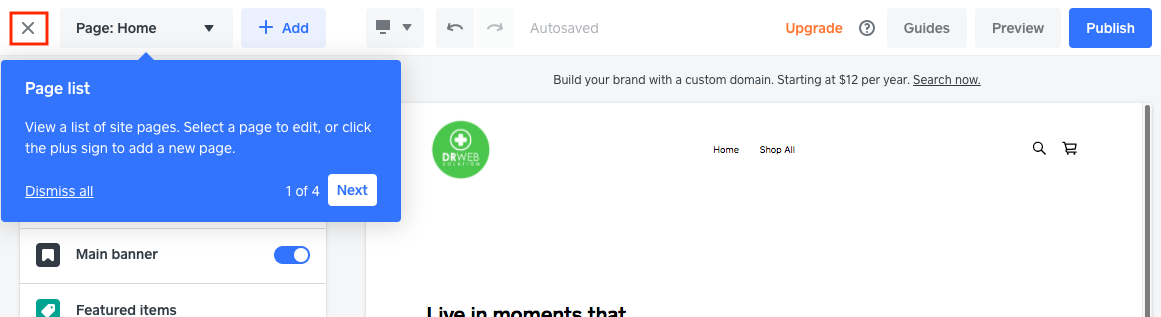
- At this point, you should be at the store customization screen. I recommend that you close this out and go on to my next section (Step 4: Create Items To Sell) so that you can create the necessary items and avoid having to backtrack once those have been created.
You should be at a screen similar to this one; just click the X I’ve highlighted in red in the upper left hand corner to exit the site editor. - …And move on to Step 4!
Step 4: Create Items To Sell
You’ll be creating services and/or products that will live in your Square store.
- From the left menu, select Online. *Important: don’t create items directly in the regular Items section, make sure you’re in the Online category – the regular Items section is meant for items sold directly in a brick and mortar location, so there are far fewer customization options for the item display.
- Select Items in the left hand menu, and you should be taken to Site Items.
- Click the “Create new item” button.
- Choose whether you’re going to be creating a physical item, a service, an event ticket, a digitally-provided file, or an ongoing membership. You can change the item type once you’ve added details, so don’t stress too much if you’re not sure which to pick. The primary difference is product vs. service, as the former is physical and the latter an advance payment for a service to be provided by the business.
- Upload an image (you can use a stock image or graphic if it’s for a service), add a description, set a price (if you’re offering a promotion, put the lower price in the “Sale Price” box and the normal price in the “Price box).
- Set other related pieces – if it’s a product you’re selling, you’ll determine whether Shipping, Pickup, Local Delivery, or Self-Serve Ordering applies. You can set tax and shipping amounts globally for your account on the Settings and Fulfillment pages, respectively (both accessible from the left hand menu).
- Categories – When you create categories, you can use these as different sub-stores in your store menu. Depending on how many items you’re selling, categories may be useful or they may not. No pressure to create them now, you can always come back to them.
- Now it’s time to go back to your Store Editor and add your newly created items! If you don’t want to include specific items on your home page, all items set to “Visible” will be shown on your Shop page, so there’s no need to select every single one (or any).
Extra Credit: Gift Cards
I find that gift cards make sense for every small business, no matter the industry. There’s no harm in giving your customers that option in case they’d like to gift your offerings (and bring another potential customer into your sphere to boot). People love gift cards because they’re an easy gift option that still feels meaningful to the recipient, especially when they’re for a unique small business that the gifter thinks they’d enjoy.
Fortunately, Square makes it very simple to create gift cards.
- Click Online from the left menu
- Click Items to bring up the drop down menu
- Click Gift Cards
- Click Manage to pull up the full gift card menu
- Choose whether you’d like to sell gift cards in your Square app and/or online. I recommend selecting both, and also selecting “Show a link to my eGift cards in public directories.”
- Select the designs you’re interested in including. I recommend selecting some of the more general designs so that you don’t have to be constantly changing them – if you select holiday designs, make sure you set a note on your calendar to remove those once the season has changed. Nothing worse than having Season’s Greetings still up on Valentine’s Day.
- You can also click Manage Designs to bring up the option to upload your own design. The dimensions should be 640 x 400 for any custom designs.
- On your Gift Cards menu page, copy the link to include on your website, social media and other marketing materials.
Step 5: Publish Your Store
Time to go back to the Store Editor tab that you left open in step #3 (or click Online -> Website -> Edit Site to get back to it)! Make sure your items are displaying the way you’d like and give each page a once over to make sure your store is ready to go – and then hit Publish.
Congratulations, you officially have an eCommerce store!
Step 6: Promote Your Online Store
Now, it’s time to make sure your business’ online store gets the love it deserves. Make it as simple as possible for your customers to make purchases and support your business.
- Website – Skip this step if you don’t have access to your website or have a current website manager (and if you’re interested in getting one, we’re here to chat). If you’re able to update your site, I highly recommend putting your Store link in your main menu. It can nest under Resources, About Us, Contact Us, or similar options if it doesn’t feel like it makes sense in the main menu. It can also be valuable to add a blurb and link to your store on your home page.
- Email marketing – We love, love, love email marketing because it’s the lowest-cost way to engage with your existing customers. And since they’re already engaging with you digitally through your email marketing, they’re primed to check out another virtual option: your online store. Announce that your services/products are now available online, and offer an exclusive promotion to your email list – you can set this up in the Items -> Coupons menu in your Square store. Set a special code for your email list and let them know this is only available to them to capitalize on that exclusivity.
- Social media – Post a link to your online store on Facebook, Twitter and Google Posts, and add it to your Instagram bio (highly recommend setting up a Linktree so that it doesn’t have to replace your regular website). Create a graphic announcing your online store and implement another social-specific promotion code so that you can track which channel delivers the most revenue (super helpful to know for future sales and marketing).
- Facebook and Instagram ads – If you want to give your social posts and store a boost, consider a Facebook/Instagram ad campaign. This is an entirely different How To realm – one that we’ve written a bit about – but you can start with something as simple as adding budget to an existing post about your store to get it in front of more eyeballs.
Looking for more hands-on assistance with your online store?
Reach out with any questions – we love helping small businesses thrive.