
 During the holiday seasons, your opportunities for online marketing explode. But you need to plan ahead to take advantage of the opportunity. It’s not too late for a boost to December business – follow our tips below to get some new patients into the office before the new year. The best part? This won’t take a ton of effort on your office’s part – just make sure to set aside a little time this week and you’ll see the results come January 1!
Easy Holiday Dental Marketing
- Try out holiday specials – Some of the most popular specials tend to revolve around whitening or new patient exams – and you can stay along these lines. Just make sure to tie in the season to your offerings. December has plenty of opportunities for gift purchasing (and receiving), and January 1 brings a new year and resolutions for self-improvement. Patients hoping to give their health a little more attention or to brighten or straighten their smiles will be very responsive to special pricing. You don’t have to promise enormous discounts, but make sure to promote your specials as if they’re the best ones available and patients will respond in kind. Use social media to connect with your current followers; tag any relevant brands and hashtag treatments to grow your reach.
- Don’t forget to update your hours online – This might not seem super important, but prospective (and current) patients take note. The holidays bring special closures that aren’t consistent with your typical hours. If a patient is trying to reach you, they’ll appreciate seeing that you’re closed as soon as they pull up your listing on Google. Not sure how to change your hours? Google My Business is one of the easiest (and most important) places to make an adjustment – follow their instructions for setting special hours and you’ll be all set. Including some kind of note on the contact page of your website is also a good idea – ask your web developer for help.
- Offer giftable treatment options or packages – Like we mentioned, December brings droves of frantic searchers looking for the perfect gift. Why shouldn’t that gift be of the dental variety? Packages for teeth whitening, Botox or dermal fillers, or other cosmetic treatments are incredibly appealing and offer a special opportunity for buyers to go above and beyond in their gift-giving. Bundle units of Botox or whitening + Botox for smile and skin-boosting opportunities.
- Tweak your PPC wording to fit the season – One positive of PPC advertising is that it’s always out there doing its job, with or without your input. But this makes it all too easy to forget to update your ad text. Whether or not you’re offering holiday specials, frame services with the time of the year in mind. This will help your ad listings stand out, even among a sea of local options. It’s always better to be specific, no matter what you’re marketing.
- Use the new year wisely – Now is the time to get patients in the office. The start of a new year is a unique time when we’re all taking a look back at what we accomplished in the prior 12 months. Send out appointment reminders to patients who haven’t made it in since early 2016, or didn’t make it in at all. Now’s the period when they’ll be especially motivated to make positive changes to their lives – and they may have resolutions to get their teeth cleaner and healthier moving forward.
Holiday Marketing Help for Dental Practices
Looking for a little assistance fine-tuning your practice as we head into 2017? We’d love to be a part of your marketing team – just get in touch for details on how we could power up your online presence.
Holiday Dental Marketing | Dental Marketing During the Holidays | Dental Marketing Tips
 Promoting your practice can be as easy as pulling out your smartphone!
How’s your practice’s social media presence? Do you post on a regular schedule, or just when you remember to, or have you lost the password to your Facebook account? No matter your current approach, there’s probably room to improve your patient engagement. Social media might seem frivolous, but it’s become a driving force for small businesses. Many patients actually ask questions and even schedule appointments via Facebook – if they can find your office’s page. But how do you make sure you’re out in front of current and prospective patients?
Don’t get overwhelmed by the social media machine. The practices with the most engaged followings are the ones posting personalized photos and other content that relates to the individuals connected to the office – both staff and patients. While an educational, eye-catching infographic or a goofy comic can go a long way, patients want to feel a connection to your practice’s community. And that means thinking about online content during the workday.
This doesn’t have to be tedious or time-consuming. By putting some steps in place, getting valuable photos, blurbs, testimonials, and other social media (and website) gold will feel second nature.
Capturing Your Office’s Personality in the Digital Realm
- Make posting simple – First off, you need to make sure that it’s easy to connect with your social platforms. Make sure the staff member responsible for gathering content has the Facebook, Twitter, and Instagram apps on their phone. For Facebook, they can be added as a user to your business page, and then post while logged into their own personal account. For Twitter, it’s simple to add multiple users if they already have a private account, and switch between the two – Instagram is the same. This will all make it easy to upload photos and videos, since everything will be ready ahead of time – there’s no reason not to share!
- Take before and after photos – Have a release form on hand that patients can quickly sign after completing cosmetic or restorative work. Snap a picture before they get started, and one after treatment is complete. Then, upload both photos in a single post or tweet so that visitors can see your beautiful work. These are also crucial for your website – after posting, forward them to your website manager and ask that they add to the Smile Gallery page.
- Capture fun moments – Is it a staff member’s birthday? Is there a puppy stopping by the office? Satisfied patient sent flowers or a thank you note? Take a quick photo and share online. Your audience will appreciate seeing the human side of your business, and these types of posts receive far more engagement (likes, shares, and comments) than others.
- List events – If there’s something special coming up, make sure everyone knows. It’s always good to be on a patient’s mind and appearing in their social feeds. Plus, this helps pull in RSVP’s for open houses or sign ups for specials.
- Ask happy patients to be in brief videos – When a patient has loved their experience at your office, they’re usually thrilled to be a voice for your practice. Ask patients if they’re interested in being in a quick video testimonial. Have some questions ready ahead of time so that they have necessary guidance.
If you’re ever looking for help with your social media, we’re here to offer expert tips. Just get in touch!
 Don’t get bogged down in code – here’s what the symbols within are saying about your SEO
How strong is your website? There are so many ways to go about answering that question, so the process can feel understandably weighty. What is “strength” when it comes to a website, anyway? And where do you get started with the evaluation process? The answers to your website’s strength might seem hidden away, but there are free tools and expert tips that you can try on your own before deciding on next steps.
We’ve compiled some of the most valuable below to help you along the way. These will determine how effectively your website appeals to both search engines and users, the two audiences that determine your online success. Once you’re paying attention to both fronts, your site is firing on all cylinders. But in order to get there, you’ll need to perform a thorough analysis first.
Evaluate Your Practice Website With These Helpful Tools
- Pull up your page source – The page source, accessible in most browers by right-clicking anywhere on a web page and clicking “View Page Source” from the menu that pops up, has a lot to say. Don’t get overwhelmed by the code that comes up – instead, use “Control+F” or “Command+F” to look for a few phrases. You should check on your h1, h2, meta title, and meta description. Each web page should have a single h1 and a single h2 – both are big signals to search engines on the content of the page. If you have multiple h1s or h2s, that message could become muddled. Your meta title and meta description tell search engines how to display listings that link to that page, and the title plays a particularly important role in classifying your site’s content. All of these entities should be well-written and contain phrases that properly identify your business.
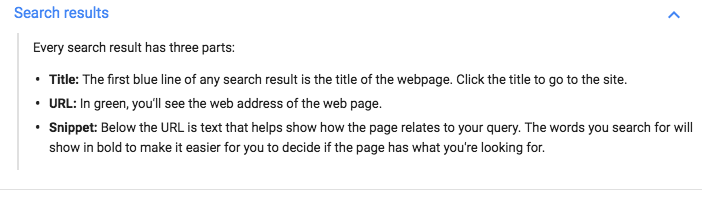
- Search for your own practice – Perform a Google search for your practice. What results come up? How is your site listed, in terms of both its title and description? It’s also wise to take a look at how your search listings are structured. The metadata on your practice’s website pages communicates with search engines and tells them how to portray the business and the specific page. A properly optimized site will inform users and appeal to their interests with each section of the listing:
- Check online directories – Google Maps, Yahoo Maps, and Bing Maps are the heavy hitters. And Google accounts for anywhere from 67%-90% of search traffic, so that should always be your top priority. Try pulling up your business on local listings directories like these, and you can see how it looks and what needs to be fixed. The location of your practice plays a big role in convincing new patients to convert, so these map listings are crucial.
- Take an objective look at your content – Most prospective patients are going to read your website (or at least 1 page of your website) before calling or clicking to contact you. If your site has copied text (if you’re not sure, you can check its originality with a free plagiarism tool), it’s not going to rank as well, and users aren’t going to get a feel for what makes your practice unique. Make sure your content reflects your practice’s mission statement! Photos and videos are also extremely important to have on each page – these improve page quality in search engines’ eyes and also provide visitors with strong visuals.
- Perform a mobile-friendly test – Analyze your URL to see whether your website is responsive. This will not only win over users but now leads to serious rankings consequences for those who do not comply.
- Steal your competitors’ secrets – Their online secrets, that is! Tools like SEMrush will allow you to check on what other dentists in your area are doing on their websites, and where they’re building links. You can also check on their rankings vs. your own for key local phrases.
- Check page speed – Another free tool for site managers, Google’s Pagespeed Insights will tell you what you might be doing wrong and whether your site is running too slowly. Site speed is imperative for a positive user experience and high rankings alike.
- Check for broken links – We recommend setting up a Search Console account with Google to do so, but this is only possible if you have access to your website files. You can easily check for 404s, 403s, and other link issues under Crawl → Crawl Errors. If you don’t have access, use a free tool to crawl your site and find any problems that need fixing.
- Consider your online reputation – Which review sites show up, and where they are in the rankings? How positive are your online reviews? Making sure these profiles are strong is essential in building a presence that will have prospective patients feeling comfortable and trusting in your services.
Need help performing your analysis, or implementing any improvements? We’re here – just request a free website evaluation for a detailed rundown of where to get started.
 Facebook is an incredible marketing tool – in the right hands. But when you’re just getting started with Facebook for business, it’s tough to know anything that’s going on, and the interface doesn’t exactly make the learning process simple. When you add in Facebook’s lack of one-on-one support (and the endless number of confusing forum questions), taking the first steps toward promoting, advertising, and managing your business feels completely overwhelming.
But you’re not alone. Our team has worked through common Facebook obstacles and figured out the simplest ways to get the green light on your business’ page. Read through our guide to setting up your Facebook page and personal access below, and get in touch if you need help with Facebook ads, organic posting, business optimization, or anything else in the Facebook landscape.
How to Manage Your Facebook Business Page
Getting started with Facebook is different depending on the current status of your business’ page. Check for existing page listings by searching for your business name in the search bar (click “Pages” to narrow down search results).
- If you have existing, unclaimed listings – It’s possible for Facebook pages that represent your business to exist even if nobody from your practice created it. This is because when visitors use the “Check In” feature, a location listing is created if one doesn’t already exist. You want to round up and take control of these unmanaged listings to use them to your best advantage. Follow the instructions after clicking “Claim this Page” to take control. If you have multiple accounts, merge the pages via requests to Facebook.
- If you do not have any business listings – This is actually the simplest possible situation – you get to start from scratch and don’t have to deal with claiming floating listings. Just log into your personal account and click this link: Create a Business Page.
- If you have an old personal account that was acting as your page – Before Business Pages become more popular (or even existed), plenty of businesses used personal profiles as pages. If one of these is still lingering, you can convert it to a page to gain all the business benefits.
How to Access Your Facebook Page – Linking Your Personal Profile
This confusing twist has perplexed newcomers trying to claim a page. The catch is that business pages aren’t actually Facebook accounts, whereas personal profiles are. Pages exist independent of any account – and continue to do so until someone links their personal page. So there’s no new login associated with your page. You’ll need to link it to your personal Facebook account to gain access.
If someone from your practice already has access to the business page, have them add you as a manager so that you’ll be able to act as the page and manage incoming messages and posts. This means navigating to the page, then clicking Settings -> Page Roles. On that page, they’ll be able to add the email address that you use to log into your personal Facebook, and you’ll be invited to manage the page. If you’re the one adding a new user, choose between these roles to grant them the appropriate level of access:
- Admin – Can control every aspect of the page and also assign page roles. Best for whoever is managing your Facebook presence.
- Editor – Has similar capabilities to an Admin, but can’t assign page roles. Best for whoever will be responding to messages and posting as the page.
- Moderator – Can respond to comments and messages and create ads. Best for the majority of your staff / your front desk.
- Advertiser – Can create ads and handle the page’s advertising. Best for ad-specific consultants or agencies.
- Analyst – Can view page insights. Best for a consultant who will not be posting as the page but will be diagnosing potential issues/existing strengths.
Confident Facebook Posting – Whether Business-Related or Personal
The most important question of all: if your business page is linked to your personal profile, how can you be sure that photo of your dog in an adorable bow tie ends up posted to your friends, not your patients and coworkers? It’s as easy as making sure that you’re posting as a page instead of acting as your profile. Whenever you post something new, look in the upper right-hand corner of the post box. There, you can choose between “Post as (Your Personal Profile)” vs. “Post as (Your Business Page).” Just pick the business page logo and there won’t be any embarrassing mishaps.

Remember: unless you’re on the business page when posting, the default poster will be your personal profile.
Your Facebook for Business Questions
This is only the first step toward Facebook domination for your practice. If you’re looking to learn more about the minutiae behind social media marketing, just get in touch!
 Feel like your leads are floating on the web and not leading to actual results? Help your front desk pin them down
When your website is performing and you’re pulling in leads, that’s exactly what you’ve been wanting to see from digital marketing. But how can you make sure that those leads lead to real patients coming into the office? It can be confusing to organize those details, especially if you’re operating off email alerts. We all know how quickly something can get buried in an inbox, especially if your leads email address is the same as your main office’s address.
Fortunately, things can be a whole lot simpler. By integrating an automation platform with your WordPress forms, you’ll see your leads neatly filling out a Google spreadsheet. Your front desk will be able to manage those leads directly within that spreadsheet, and adding columns to track whether the lead has been contacted, by whom, and the outcome of the conversation will keep everyone on the same page.
Setting it up is simple – all you need is a free Zapier account, a Gmail address, and access to your WordPress back end. We break down the steps below, but if you’re looking for additional guidance, just get in touch.
Tracking Contact Forms Submissions with Zapier
We started researching forms reporting automation for a client using AdWords and Facebook PPC, and pulling in great results. While we loved seeing all the leads flood in, the office’s front desk got a little panicked. How could they make sure that each lead was called or emailed, when all the forms notifications were in separate emails?
The system we put together took the stress off their shoulders. Now, Zapier automatically pulls new forms submissions from Gravity Forms within WordPress, taking leads reporting off the front desk’s list of responsibilities. Here’s how you can set it up for your WordPress site.
1. Check Your Forms Plugin
If you’re on WordPress, chances are that your forms are built with Contact Form 7 or Gravity Forms, two of the most popular form plugins. These both offer Zapier integrations, which can be turned in on your form settings.
2. Create a Free Zapier Account
Create your Zapier account with their quick sign up process. If you have 5 forms or fewer, you don’t have to purchase a premium plan – you can build 5 zaps (one needed for each form) for free.
3. Create a Google Sheeet
- Log into Google Drive and click “New,” then “Google Sheets.”
- Give the spreadsheet an applicable name so that you’ll recognize it in the Zapier dashboard – “Leads Tracking” will work.
- Create columns that can be paired with your form’s fields – typically, Name, Email, Phone, and Comments.
4. Set up Your Zapier Integration
- Click on the form you’ll be automating in Gravity Forms.
- Go to Settings > Zapier.
- Create a Zapier Feed.
- Open a new window to visit your Zapier dashboard – leave this one open for now.
5. Build the Zap in Your Zapier Dashboard
- Click “Make a Zap!” to begin the process; you’ll be guided through each step.
- When you arrive at the screen that gives you a webhook URL, copy and paste that into the waiting field on your WordPress site.
- Link your Google Sheets account back on the Zapier site by authenticating your account.
- Set up the columns of the spreadsheet by pairing them with form fields.
- You can skip the Test section and do it yourself in the step we detail below – this often malfunctions in the Zapier back end if there’s not a recent form submission.
6. Test the Form with a New Submission
Once your zap is ready, submit a test form to watch the new spreadsheet row populate and make sure everything’s working properly.
7. Save Time!
Watch the organization take hold! You’ll spend less time asking your staff whether a lead has been followed up with, and more time seeing new patients visit your office.
Run into any bumps along the way? Just get in touch for help.